Thursday, January 31, 2013

Carrot for Carrie

The best excuse to make a cake is for a coworker's birthday. I get cake practice, everyone at work gets cake, and the birthday person gets to take home whatever cake is left.

Naked cake
Carrie requested a carrot cake with traditional carrot decorations. I was excited because carrot cake meant I got to use my new shredder attachment! I love my Kitchenaid so dearly, and every new attachment just makes it better.   For the filling, I used some leftover coconut frosting that had been waiting for a purpose since my birthday.        


Conspicuous lack of crumbs

I decided to forgo a crumb coat and just get the frosting on there. Lo and behold, it worked!   I put a fairly thin layer of frosting on, and I realize now that I could have gotten away with a pretty thick helping. I'm bad a spatial reasoning, which makes me bad at portioning. Oh well, no crumbs showing through!                                                                                                          
I'm pleased with the colors - vibrant but not terrifying. Carrie said that she really liked orange and green, which fit nicely with the carrot theme. I thought about practicing a few carrots to try to get them uniform, but I decided that real carrots are not uniform cones so I went crazy with carrot borders. 


My lettering is a little crooked. Lucky for me I had lots of frosting left (see above) so I'm going to get some lettering practice in this weekend.


I used the grass tip (or as I like to call it, the Muppet fur tip) for the carrot stems. It's not as clean looking as the leaf tip would have been, but I was going for authenticity! I was worried about the spacing on the carrots at first, thinking they were too far apart, but I think they would look weird if they were overlapping at all. 

Finished cake
This was a fast one - I was done in under an hour, including making the frosting. I was done so early, I even did some of the dishes instead of leaving them for tomorrow. I can't wait to bring this one in.

Sunday, January 27, 2013

Maggi's Birthday

I've signed up for Level 3 of the Wilton classes, but I highly doubt it will actually happen. I'm operating under the assumption that it will be cancelled yet again, so I'm going to teach myself how to use fondant in the mean time.


My dear friend Maggi turned 25 this past week, and I decided to make her a birthday cake in an effort to get some decorating practice in. I was thinking about wedding cakes and white on white decorations and wanted to play around with that a bit. First, the cake: Lightning Cake from Joy of Cooking. I know that I am not the best at baking, but this was one seriously weird recipe. The batter was very thin, and the butter was the last thing added - you can see in the top picture it didn't get fully mixed in. The result was a flat, dense, and EXTREMELY buttery tasting cake. It's not bad, it's just weird. Experiences like this are going to drive me back to box mix! I filled the layers with strawberry pie filling. I would have loved to do fresh strawberries, but I didn't think I'd get decent quality in the middle of winter.

 Because the cake was so dense, I was able to do my best crumb coat yet. You can't get crumbs in your frosting if the cake isn't crumbly! I flavored the frosting with 3/4 t vanilla and 1/4 t almond, which came out to a very nice, mild almond flavor. I think it will go perfectly with the buttery buttery cake.


My hands were a little sticky during the decorating process, so I only have finished product photos. I rolled fondant to cover the cake and then made the fondant pearls along the bottom. My piped swags are hilariously crooked and uneven, so one of these days I'm going to have to sit at my practice board making a million swags. I had a little trouble with the roses - I couldn't get the frosting consistency right, and then I had the hardest time getting them to stick to the fondant. I ended up making a little frosting base to stick them to.
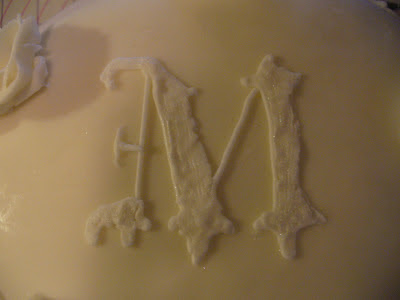
I'm proud of the monogram, piped by looking at a picture from the internet. I bet if I used ganache I could get a smoother end result for that, but it looks good for a beginner. I finished off the details with white pearl dust because I freaking love glitter.


I like how it turned out - the pearl dust gave some nice definition to the white-on-white. I'd like to practice some more with working with fondant - I can see the possibilities of having what is essentially play-doh to decorate cakes.

Wednesday, January 9, 2013

Birthday Part Two: Just Like In My Head

Frosting and decorating was a rousing success! I was too focused on the task at hand to get proper photo documentation, sadly.
 I used the basic Wilton buttercream recipe, adding half a teaspoon of mint and leaf green coloring for the Thin Mints and gobs of Hershey's caramel syrup to the Samoas. I toasted some shredded coconut in the toaster oven and it came out perfectly! I used the same mint ganache from the previous post to drizzle on the Thin Mints and it's a little goopy because I used a spoon. I got better results drizzling the Samoas because I melted some dark chocolate chips and poured them into a piping bag, snipped off the tip and viola! 

Overall I am super proud of how they turned out. They look just like I imagined them in my head, and they are going to knock everyone's socks off!

Tuesday, January 8, 2013

Birthday Part 1 - Failcakes

The Girl Scout cupcakes were started last night! I was off to a good start, I read the recipe all the way through, I had my ingredients at room temperature, my kitchen was all set up and ready to go.

I was using Joy of Cooking again, Cocoa Devil's Food Cake. I even went out an bought cake flour, trying to do it right. Unfortunately, I ran into some issues. First, I didn't have enough white sugar (who does that?) so I had to use half brown sugar. My brown sugar was clumpy, so I tried to microwave it for 30 seconds to soften it up, and it started to melt a bit. Like a fool I used it anyway. 

Then I'm afraid that I overbeat my batter in my impatience to get the cupcakes made. Although they taste great, they ended up fallen with a slightly brownie-like texture.

Boo, sad cupcakes. 
 The filling stage went well. I used canned frosting for the Samoa cupcakes out of lazyness. I had to use a larger tip because the coconut wouldn't go through to cupcake filler tip.
 My first experience making ganache went well. I'm glad I had some shelf-stable whipping cream on hand since I seem to fail at planning ahead lately. I was careful adding mint extract so hopefully it's not overpowering.
Tomorrow I will get them frosted, finished and ready to go.

Friday, January 4, 2013

Brainstorming

It's my birthday next week, hooray! I'm planning on making cupcakes so I can bring some to work and have some at home for the party. I've got some leftover Girl Scout cookies and I want to use them as garnish on the cupcakes! For the Thin Mints, I'm thinking chocolate cake, mint chocolate filling/drizzle, mint frosting, cookie on top. For the Caramel deLites (aka Samoas if you're weird) I'm not sure how I want to arrange the flavors. I could do chocolate cake, caramel filling, coconut frosting. Coconut cake, chocolate filling, caramel frosting. I think the best arrangement could be chocolate cake, coconut filling, caramel frosting. Caramel cake, coconut filling, chocolate frosting? Tough choices to make, not a lot of time to make them. Also, I need to go buy a cupcake carrier. I work too hard on making them pretty for them to slide around and mush.